Native write-back in Power BI (Fabric preview)
- Vojtěch Šíma
- Jun 13, 2025
- 7 min read
Updated: Jun 17, 2025
tl;dr: Microsoft just dropped two new preview features—Translytical Tasks Flow in Power BI and User Data functions in Fabric. These two open the door to dynamic, real-time actions that let you modify SQL Server tables (and more) straight from a Power BI report. In this post, we’ll look at how you can use them to write back comments directly to your source system—natively, with no workarounds.
Requirements:
Microsoft Fabric (can use a Trial); User Data Functions (enabled in Fabric); Translytical Tasks Flow (enabled in Power BI Desktop May 25 + version)
Disclaimer:
This is just a first look, so we are not diving deep into all the components mentioned here. Still, this walkthrough should give you everything you need to build your very first write-back function on your own.
The Feature We’ve All Been Waiting For
I bet you’ve been waiting for a proper way to add comments directly in a Power BI report—just like you do in all-knowing Excel. Until now, you had to rely on all sorts of hacky workarounds with Power Apps, Power Automate, or other thingies.
Well, now you can do it right from your beautiful report. All it takes is a little bit of setup.
User Data Functions (UDF)
User Data Functions are basically the engine behind all the new possibilities. It’s a new type of Fabric item that lets you define custom functions written in Python. These functions are mainly used to interact with other Fabric components—like SQL databases and more. The feature is currently in Preview, so you’ll need to enable it in the Admin Portal first.

We won’t dive deep into setup here—this article is all about the write-back functionality, which is just one of the many things you can pull off with this powerful Fabric feature.
Translytical Task Flows (TTF)
Translytical Task Flows are basically the “play button” for User Data Functions. They let you trigger a UDF directly from a Power BI report, making automation possible without ever leaving Power BI.
TTF doesn’t introduce a new visual or anything fancy. It simply extends the good old Button visual with a new action type called Data function. You can also pair it with the new Text slicer, which plays nicely with the button and lets users input dynamic values.
Both features are still in preview (as of writing), and you’ll need to enable them in Power BI Desktop.

How to build a write-back action in Power BI
Our setup will be simple:
We’ve got a SQL Server in Fabric and a basic table to store product comments. Nothing fancy — just a product_id and a comment column. The idea is to update the comment for a selected product with whatever the user types in and immediately display it.
It’s a pretty primitive example, but for this preview, it’s more than enough to show what’s possible.
Create a User data function
We’ll start by building the logic behind the action. In your Fabric workspace, create a new item of type User Data Function, then open it up to begin editing.

Click New Function, and then in the editor, click Manage connections.

Click Add data connection, and choose the database where you will update the comments.

You do not need to move your entire data source into Fabric. All you need is a small comment store, just a simple table to hold the comments. You will connect it to your semantic model using a primary key, like product_id. That way, only the comments live in Fabric while the rest of your data stays wherever it already is.
Now for the fun part. We need to write the function that does the heavy lifting. It’s written in Python and uses some Fabric-specific libraries. But don’t worry — if you’re not a Python pro and the logic is simple like this, you can just vibe-code it.
Your function might look something like this:
import fabric.functions as fn
import logging

udf = fn.UserDataFunctions()

@udf.connection(argName="sqlDB", alias="writebacksql") # alias equals alias in Manage connections
@udf.function()

# watch out for underscores, they are not allowed in the definition
def UpdateProductComment(
    sqlDB: fn.FabricSqlConnection,
    productId: int,
    comment: str
) -> str:
    logging.info("Processing UpdateProductComment")

    # Validation
    if not comment or not comment.strip():
        raise fn.UserThrownError("Comment cannot be empty.")

    # Parameterized update
    # Here you write actual SQL Query with actual column names
    query = """
        UPDATE [dbo].[product_info]
        SET [comment] = ?
        WHERE [product_id] = ?
    """
    params = (comment, productId)

    # Debug logging (fully-expanded T-SQL)
    tsql = query.replace("?", "{}").format(
        *[f"'{p}'" if isinstance(p, str) else p for p in params]
    )
    logging.info(f"Executing SQL: {tsql}")

    # Execute
    conn = sqlDB.connect()
    cur = conn.cursor()
    cur.execute(query, params)
    conn.commit()
    conn.close()

    # Some nice message about the execution
    return f"Product {productId} comment updated with text '{comment}'."
This function takes a productId and a comment, then updates the corresponding row in the product_info table using a parameterized SQL query. It includes basic validation, logs the action, and returns a confirmation message when the update is complete.
Pay close attention to the query variable — you need to insert your actual column and table names there. Also, in the @udf.connection decorator, make sure the alias matches exactly with the alias defined in Manage connections. Otherwise, the connection will fail.
One important thing to watch out for: in the UpdateProductComment function, you can’t use underscores in the parameter names. But no worries — your function parameter names do not need to match the column names in your actual table. Just make sure the SQL query maps them correctly.
This version of the code is already about as lean as it gets. If you want to trim it down even further, you can remove the debug SQL logging block — it's useful for troubleshooting but not required.
Now, just publish your user function.

Don't forget to run/test it first.


Run the User data function in Power BI Desktop
Now we have a working User data function, let's make some simple visuals to trigger it.
Connect the comment table to your semantic model


I recommend choosing DirectQuery, as this is a tiny table, and you will see your comments immediately.

Now, do any necessary changes to your model so you can view the comments with your product dimension.
Given you have enabled preview features, let's create a blank button and text slicer visual.


Now, depending on your usage, you can display the comments in a visual table.

Let's set up the Button visual.
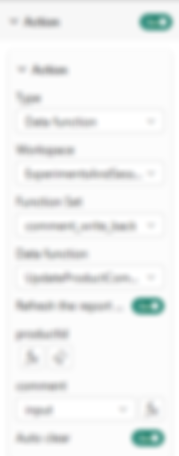
In the Format pane, go to Actions, turn it On, and choose Data function as the action type.
Now fill in the required info:
Workspace – The workspace where your User Data Function lives
Function set – The name of your User Data Function item
Data function – The specific function you want to call
Then, map the function parameters:
productId – This links the comment to the correct product. I recommend creating a measure like SELECTEDVALUE('table'[product_id]), then clicking the fx icon, choosing Field value, and selecting your measure.
comment – Here, select your Text slicer visual. To make your life easier, go to the Selection pane, rename the slicer to something like "input", and then select that name in the dropdown. If you don’t rename it, you’ll have to pick from a random generated ID, which is not fun.
I recommend keeping optional toggles like I do.
Optionally, in the Button style section, you can add text like Submit to make the action clearer to users, but it’s not mandatory. Aside from the Data function setup, you’re free to style the button however you like, including the new Loading state, which is a nice touch for user feedback.
Quick tip — after setting up the Data function, most styling changes happen in the Disabled state. So if your tweaks aren't showing up, that’s where to look.
Well, and that's the setup.
Trigger the Data user function from Power BI
Depending on how your function is set up, the process might vary slightly. In our case, we want to select a product, write a comment, and submit it.
Here’s how it works:
Select a single product, for example, by clicking on a row in your table visual. This triggers the measure used for the productId parameter.
Without clearing the selection, type your comment into the Text slicer.
Click the Submit button. (Ignore the little arrow icon in the slicer and don’t assign any field to it.)

After submitting, a Request submitted message window will pop up, showing what action was triggered.

Close it, and your comment should show up immediately next to the selected product_id.

Security and sharing
Naturally, when adding another layer like this, permissions come into play. But the setup is actually pretty straightforward. Let’s say we want to follow this scenario:
Our report is published through a Power BI app, and users do not have access to the workspace that holds the SQL Server, semantic model, report, or the User Data Function.
Here’s what you’ll need to make it work:
SQL Server – Grant Read all data using SQL database permission. You can also assign more granular roles directly in SQL using the GRANT statement.
User Data Functions – Assign the role Execute Functions and View Function Logs (this is a single permission option)
Power BI App – Give users regular access to the published report through the app
With this setup, users will be able to view the report and interact with the comment functionality without needing direct access to the underlying workspace.


Summary
To sum it up, with just a bit of setup, you can now build a fully functional write-back feature directly in Power BI. Thanks to User Data Functions and Translytical Task Flows, you no longer need external tools or complex workarounds. Whether it's commenting, flagging, or sending updates back to SQL, it's all possible inside your report. Add in the right permissions, and you're ready to roll with a smooth, interactive experience your users will appreciate.